Thursday, 26 July 2012

Floral Jewel Headband


During hot summer months, headbands are more than just a hair accessory; they are a hair necessity! These fashion favourites keep you looking stylish while also keeping stray hairs in check and off your face.  I wanted to embellish some of my basic headbands and make them more appropriate for a night out. Using some felt, craft jewels and a glue gun I created a pretty floral design to add some much needed glamor to my everyday headband. I absolutely love the way this headband turned out, I can’t wait to embellish the rest of my headband collection and possibly create a miniature version for my niece!
If you want to make your own Floral Jewel Headband you can follow my steps below.
Materials
-          Craft Jewels
-          Felt
-          Headband
-          Glue Gun
-          Scissors

Step 1: Layout your design using your craft jewels.
Step 2: Cut out a piece of felt that is roughly the same size as your design.

Step 3: Using your glue gun affix the jewels to the felt.
Step 4: Once you have glued your entire design to the felt, cut away any excess felt.

Step 5: Place some glue on the back of your design and affix it to your headband.

Step 6: Wear and Enjoy!

Sunday, 22 July 2012

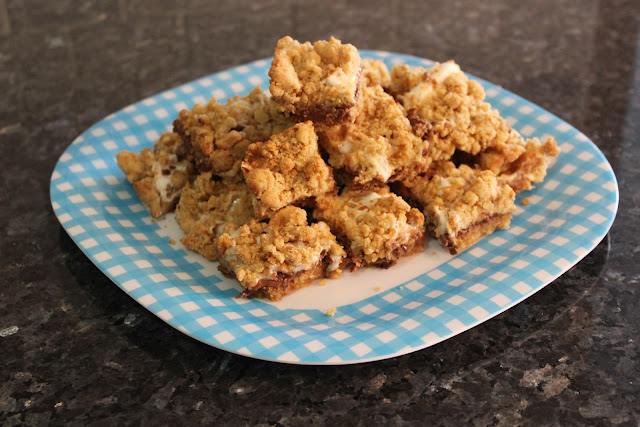
Sweet Treat Sunday: S’more Cookie Bars

Nothing says summer quite like making s’mores around a campfire. So when Mr. D and I got invited to a potluck BBQ this weekend I knew I wanted to bring something that would capture that summer feeling.  When I stumbled upon this yummy s’more cookie bar recipe I knew they would be perfect! These cookie bars were super easy to make and tasted just like a campfire s’more, needless to say they were a big hit at the BBQ!

I’m already looking forward to making these again for a family BBQ in a couple of weeks, I’m thinking of adding some coconut to the marshmallow and chocolate layers to kick things up a notch!

Monday, 16 July 2012

Clip-On Earring Pendant

A few posts ago, I mentioned the beautiful clip-on earrings I purchased at a charity jewellery sale in South Hampton, Ontario last summer. This weekend I was reminiscing about that wonderful week at the cottage and was inspired to create something new with the remaining clip-on earrings. I wanted to showcase the beauty and vintage charm of each of the earrings and so I decided to keep things simple and create pendants. I used some leftover jewellery chain and recycled clasps from a set of old bracelets, attached everything together and clipped on the earrings and VOLIA – two beautiful vintage pendants to add to my jewellery collection. 


Saturday, 14 July 2012

Decorative Wall Letters

I created these garden themed wall letters for my cousin’s brand new baby girl. I purchased the unfinished wooden letters at Wal-Mart and gave them a coat of paint in alternating colours of pink, yellow and green. I then chose a patterned scrapbook paper to complement the colour of each letter and affixed it using some Mod Podge. Finally, I accented each letter with some wooden garden cut-outs that I purchased at the dollar store quite some time ago. I was waiting for the perfect opportunity to use these sweet little cut-outs and these letters were definitely it! I added an extra detail to a few of the cut-outs with some hot glue and tiny white buttons. I can’t wait to give these letters to my cousin and meet her sweet little girl Nailah!


Friday, 6 July 2012

Headboard Makeover

Mr. D and I were on vacation this week and decided to tackle some of the projects on the good old To Do List. One of the projects at the top of our list was refreshing our headboard. We purchased the headboard almost 3 years ago when we got married and have since grown tired of its colour and fabric. We are still fans of the upholstered headboard look so we decided to reuse our current headboard as a base and simply recover it with some new fabric we purchased at our local Fabric Land. We purchased 2.5 meters of fabric and that was more than enough to cover our queen sized headboard and the button accents as well.

This project was super simple and fairly inexpensive.  Here is a quick approximation of what we spent.

-          $35 for the 2.5 meters of fabric (it was on sale for 50% off – YAY)

-          $40 for the staple gun and staples (Mr. D was thrilled to have an excuse to purchase a new tool)

-          $10 for the fabric button kits and upholstery thread

The pictures below show what our headboard looked like when we started , as well as some of the recovering process and of course the final product!

What our headboard used to look like.
The back of the headboard.

Another shot of the back of the headboard. We removed the black fabric to make it easier when stapling the new fabric overtop.
Measuring out the new fabric.
The finished headboard installed and looking fabulous!
Another shot of the finished product!

I

Wednesday, 4 July 2012

Jewellery Chain Earrings

I created these simple and airy earrings using some jewellery chain and earring hooks from the craft store. As an alternative to the craft store jewellery chain, you could use any old, vintage or broken chains that might be collecting dust in your jewellery box.  It might also be fun to mix metals and create a pair that mixes silver and gold chain for a more eclectic look.


Materials
  • Jewellery chain
  • Earring hooks
  • Wire cutters
  • Needle-nose pliers


Step 1: Decided on the length of your earrings.


Step 2 & 3: Cut several strands of jewellery chain to the desired length. I ended up using seven strands for each earring. Use your needle-nose pliers to open the loop at the end of your earring hook and slip on your strands of jewellery chain. Once you have added all the strands of chain you can close the loop back up and your jewellery chain earrings are ready to wear!